Recovering a bricked reMarkable 2
I’ve had a reMarkable 2 e-ink tablet for a number of years but I found it collecting dust more recently. In looking for ways that I could re-purpose it, I found that the reMarkable tablets actually run on a modified linux kernel called Zero Sugar and a heavily customized linux distribution that you can access via SSH over USB. That has spawned an entire community of hackers that have created all kinds of CLI tools, utilities, and applications for the reMarkable to extend its functionality beyond just a note-taking tablet. Well, my curiosity get the best of me and one thing led to another, which led to a bricked tablet.
How I bricked my reMarkable 2
When I learned that you could access the reMarkable over SSH, I started looking at CLI utilities and programs that might be useful. I stumbled on a community-maintained package manager called Toltec that makes it very simple to install a lot of these CLI utilities. Toltec only supports OS builds between 2.6.1.71 and 3.3.2.1666, and I happened to be on the latest version of the OS which was quite a bit more recent than this, requiring me to downgrade the OS. Newer versions of reMarkable’s OS have not added much in the way of local features and have instead focused on cloud-enabled features with reMarkable’s proprietary cloud infrastructure which I did not use, so this was of little concern to me.
I started the process of downgrading my OS to 3.3.2.1666 using codexctl. Unfortunately, when I rebooted the device after downgrading I was met with the message “Disk corrupted. Tap to attempt automatic repair and restart” on reboot. Of course, tapping to repair rebooted the tablet and showed the same message to me again on reboot. More troubling, I was no longer able to access the tablet via SSH as the SSH credentials had seemingly been rotated. And since I couldn’t access the device via SSH, I was in real trouble in terms of being able to attempt recovery of the OS.
Although I am not certain, I believe that my device was bricked because I was using an encrypted data partition, which was a feature of a newer version of the OS. For anyone looking to downgrade their OS, or perform any operations with codexctl for that matter, I highly recommend first disabling disk encryption via the settings menu which will also perform a factory reset on the device. I will detail the process for downgrading the OS in a future post as codexctl is not able to downgrade from reMarkable OS 3.11.2.5 or greater to a version less than 3.11.2.5 via the conventional method.
Fortunately, thanks to the ddvk’s excellent remarkable2-recovery repository I was able to pull off a successful recovery.
Prerequisites
You will need the following to use this recovery method:
- A PC running a linux-based OS
- USB Type-C breakout board (male)
- 10 kΩ resistor
- Micro USB breakout board (female)
- Micro USB cable
- Spring-loaded pogo PIN connector (>= 5 pins)
- Soldering iron
- ddvk’s remarkable2-recovery tools
All of the hardware components that are needed for this recovery are pretty basic and can be acquired very cheaply via places like AliExpress but here are links to purchase some of them from Amazon for convenience if you are in a bind and need something quickly:
- 10pcs Female Micro USB to DIP 5-Pin Pinboard
- USB Type-C Breakout Board Male and Female Plug 24 Pin
- 4PCS Gold Plated Spring Loaded Thimble Pogo Pin
- 1000 PCS Resistor Kit 1/4 W +-1% Premium Metal Film Resistors Assortment Kit
Step-by-step solution
1. Assemble USB boards
The first step is to prepare the custom USB connections that will allow us to boot the reMarkable 2 into recovery mode. This involves creating two separate assemblies: a USB Type-C breakout board with a resistor bridge, and a micro USB breakout board with pogo pins.
Before you begin soldering anything, test your micro USB cable to confirm it works for data transfer. This is crucial because many cheap cables only support charging and will not work for this recovery process. Use a high quality cable that you’ve verified can transfer data to another device.
Take your USB Type-C breakout board and bridge pins B8 and B12 with a 10 kΩ resistor. The most secure way to do this is by soldering one lead to each pin, but I was able to bend and jam the pins for the resistor in pretty securely without having to solder. This resistor bridge is what signals the reMarkable 2 to enter recovery mode when the USB-C connection is made. If you have a multimeter available, it’s a good idea to test your resistor first to confirm it’s actually 10 kΩ before soldering it in place.
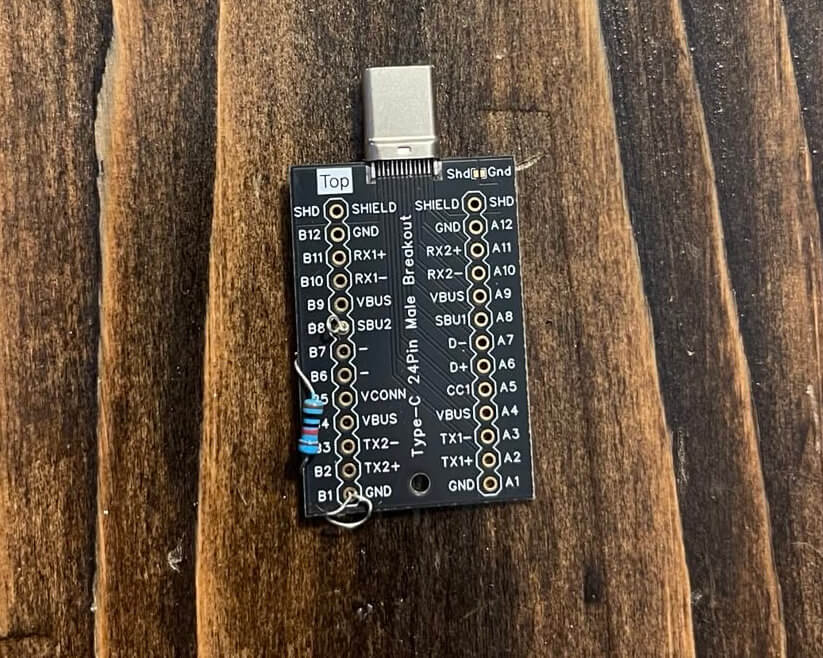 The assembled USB Type-C board
Next, take your micro USB breakout board and solder your spring-loaded pogo pin connector to it. The pogo pins will make contact with the exposed test points on the side of the reMarkable 2 tablet. Ideally your pogo pin connector should have exactly 5 pins to match the 5 test points, but if your connector has more pins (mine had 6) you can simply let the extra pins overhang past the edge. The spring-loaded pogo pins are very important because they will ensure that each pins makes consistent and secure contact. I cannot stress this part enough as I tried many other methods first which did not provide a reliable enough connection with the device.
Finally, plug your micro USB cable into the connector on your breakout board with the pogo pins attached. This assembly will remain connected throughout the recovery process, so make sure everything is secure before proceeding.
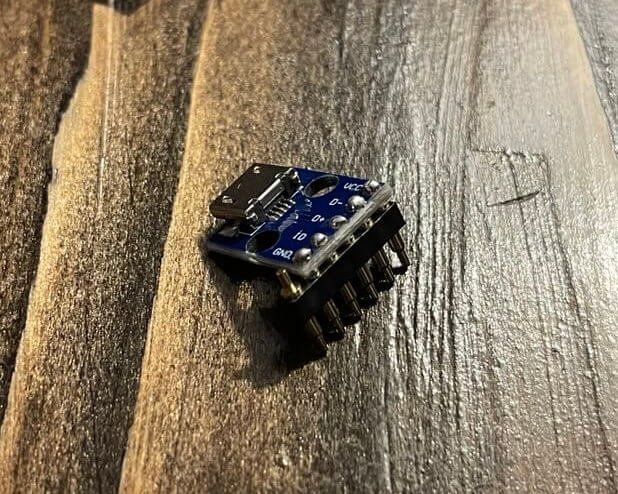 The assembled micro USB board with pogo pins soldered in place
2. Clone remarkable2-recovery tools and listen to kernel buffer
Before attempting to boot the device into recovery mode, you need to prepare your Linux PC with the necessary recovery tools and set up monitoring so you can confirm when the device successfully enters recovery mode.
Start by cloning the remarkable2-recovery repository from GitHub. Open a terminal and run:
1
2
git clone https://github.com/ddvk/remarkable2-recovery
cd remarkable2-recovery
This repository contains the imx_usb tool and other utilities needed to communicate with the reMarkable 2 when it’s in recovery mode.
Next, open a second terminal window and run the following command:
1
sudo dmesg -w
This command will continuously print messages from the kernel buffer, which is where Linux logs information about USB devices being connected and disconnected. Keep this terminal window visible throughout the recovery process so you can monitor for the specific device signature that indicates the reMarkable 2 has successfully entered recovery mode.
3. Boot the device to recovery mode
First, completely power off your reMarkable 2 by holding the power button for 10 seconds. Make sure the device is fully shut down before proceeding. When the device is fully powered off in this manner, it’s entirely possible that the e-ink display will continue to show the last screen that was rendered due to the way e-ink displays work. The screen will be completely unresponsive if the device is fully powered off.
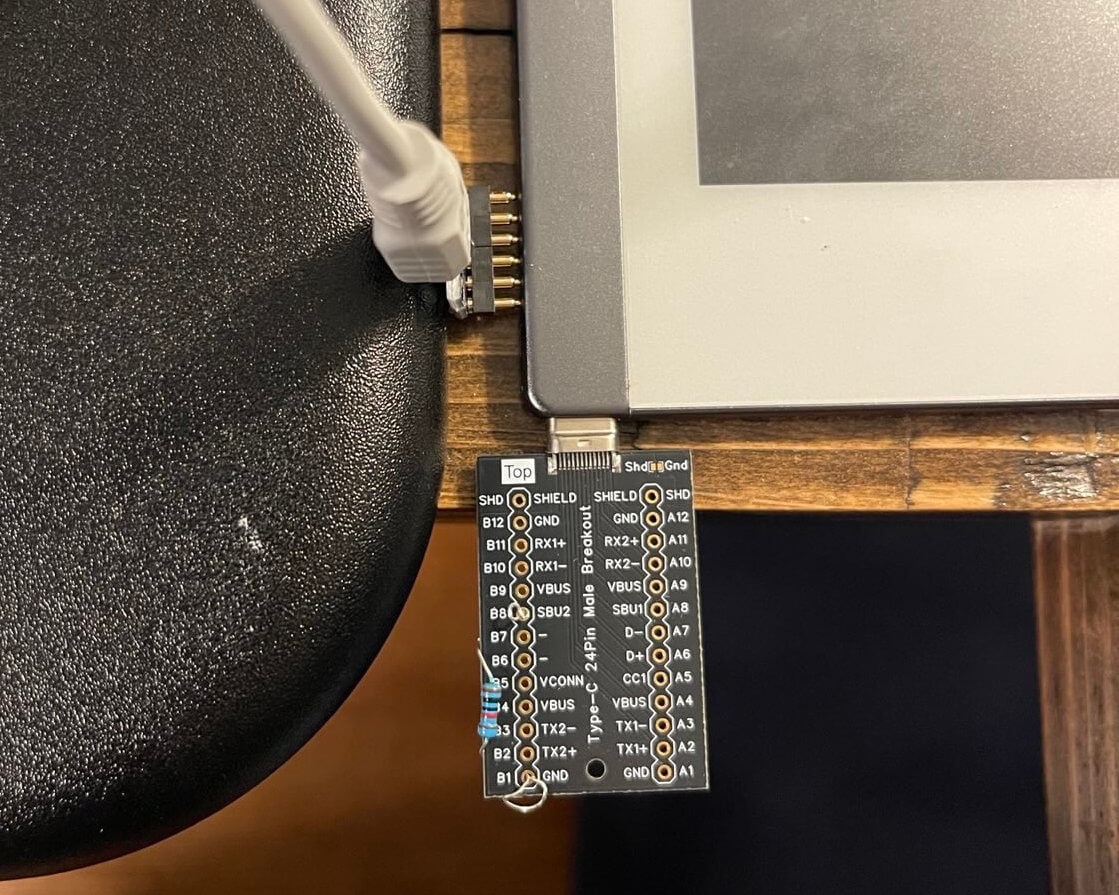
Take your USB Type-C breakout board (the one with the 10 kΩ resistor bridging pins B8 and B12) and connect it to the USB Type-C port on the bottom edge of the reMarkable 2. Pay close attention to the orientation, ensuring the “Top” side of the breakout board is facing up (on the “screen side” of the tablet). This resistor bridge tells the device to boot into recovery mode rather than normal operation. There are some cheap breakout boards that have been noted to have the top/bottom labels reversed, so if you don’t have success with this at first, try flipping the orientation of your USB C breakout board.
On the left edge of the tablet, near the USB Type-C port, you’ll find five exposed pins. You will need to line up your micro USB breakout board’s pogo pins with these pins. Starting from the bottom (closest to the USB Type-C port), the pins should connect in the following order: VCC, D-, D+, ID, and GND.
This order is absolutely critical: connecting the pins in the wrong orientation can potentially damage your device. The pogo pins need to make solid, consistent contact with all five test points. Depending on your setup, you may need to get creative with how you hold the connector in place. Try using rubber bands around the connector and the tablet to maintain pressure, or you might be able to wedge the connector between the tablet and a book or other solid object.
 I was able to get the pogo pins to seat nicely by wedging the micro USB board between the reMarkable 2 and another solid object
Once you’re confident the pogo pins are properly aligned and making good contact, connect the other end of your micro USB cable to your Linux PC. Watch your dmesg output carefully. You should see a new device appear with the identifier USB HID v1.10 Device [Freescale SemiConductor Inc SE Blank ULT1]. This is the recovery mode bootloader.
If you don’t see this device appear immediately, try pressing the power button once to turn on the tablet. For some reason, I had better luck using a USB hub rather than connecting the cable directly to my computer.
Once you see the Freescale device appear in the dmesg output, your reMarkable 2 is now in recovery mode. At this point, you can carefully remove the USB Type-C breakout board from the bottom of the tablet. Be very careful not to knock the pogo pins loose when removing the Type-C connector, as you still need them to maintain the data connection.
4. Mount the device as mass storage
Now that the device is in recovery mode and communicating with your PC, you need to load the recovery image that will make the reMarkable 2’s internal storage accessible as a standard USB mass storage device.
In your terminal, run the following command:
1
sudo ./imx_usb
This special image enables USB mass storage mode so that you can directly mount the storage to your Linux system. If everything goes well, you should see output indicating that the image was successfully loaded and your Linux system should detect a new USB mass storage device. Most modern Linux distributions will automatically mount this device, just like they would a USB flash drive. You can verify this by running the lsblk command in your terminal:
1
lsblk
Look for a new block device (probably /dev/sdb or similar) with multiple partitions. You should see a boot partition and two or three root filesystem partitions. Make note of the device name and the mount points as you’ll need these for the next step.
If your system didn’t automatically mount the device, you can manually mount the boot partition using a command like:
1
sudo mount /dev/sdb1 /mnt/
Replace /dev/sdb1 with your actual boot partition device path if different.
5. Restore from partition
The reMarkable 2 uses an A/B partition scheme for its root filesystem. This means there are two complete copies of the operating system on separate partitions, and the device can boot from either one. When an OS update is installed, it’s written to the inactive partition, and then the bootloader is configured to boot from that newly updated partition on the next reboot. This design allows for safer updates and, in our case, provides a built-in backup we can use for recovery.
First, you need to determine which partition is currently set as the active boot partition. Open the file uboot.env located in the boot partition with a text editor. If the boot partition is mounted at /mnt/boot, you would run:
1
sudo nano /mnt/boot/uboot.env
Look through this file for a line that says either active_partition=2 or active_partition=3. This tells you which partition the device is currently trying to boot from (the one that’s corrupted in this case).
The partition that’s NOT active is in fact the previous OS version that was working fine. You’re going to copy that good partition over the corrupted active partition.
Let’s say your active partition is 3 (the corrupted one) and partition 2 is the good backup. First, create a backup image of the good partition:
1
sudo dd if=/dev/sdb2 of=rm2-sdb2.raw bs=4096 status=progress
Conversely, if your active partition is 2, you would back up partition 3 instead:
1
sudo dd if=/dev/sdb3 of=rm2-sdb3.raw bs=4096 status=progress
Once you have your backup image, restore it over the corrupted partition. Continuing with our example where partition 2 is good and partition 3 is corrupted:
1
sudo dd if=rm2-sdb2.raw of=/dev/sdb3 bs=4096 status=progress
This writes the good partition image over the corrupted partition. Be patient and let it complete.
When the restore is finished, unmount the device:
1
2
sudo umount /mnt/boot
sudo umount /mnt  # If you mounted any other partitions
Or if your system auto-mounted everything, you can unmount using your file manager or the eject command.
Now disconnect the micro USB cable from your PC, and carefully remove the pogo pin connector from the side of your reMarkable 2.
Finally, press and hold the power button for about 10 seconds to reboot the tablet. If everything went according to plan, your reMarkable 2 should boot normally into a working OS. It will be running the previous version of the firmware that was on the backup partition, but it should at least be functional.
Troubleshooting
If the device doesn’t appear in recovery mode, double-check these common issues:
Pogo pin alignment: The most common problem is poor contact between the pogo pins and the test points. Make sure all five pins are making solid contact and are connected to the correct test points in the right order.
USB cable quality: Not all micro USB cables support data transfer. Try a different cable if you’re having connection issues.
USB port power: Some USB ports don’t provide enough power or have flaky connections. Try using a different USB port or a powered USB hub.
Resistor value: Verify your resistor is actually 10 kΩ. Using the wrong value may prevent the device from entering recovery mode.
Device not fully powered off: Make sure you hold the power button for the full 10 seconds to ensure the device is completely powered down before starting.
If you successfully enter recovery mode but encounter issues during the partition restore, make sure you have enough free disk space on your PC to store the partition backup images (you’ll need at least 4-6 GB free).
Conclusion
Overall, recovering a reMarkable 2 is a pretty painful experience almost seeming like an afterthought by the manufacturer. It looks like newer reMarkable devices have recovery methods that are a bit more thought out. But it does seem at the very least that this method can be used even for the most severely bricked tablets.
If you’re planning to experiment with your reMarkable 2 by installing custom software or downgrading the OS, I strongly recommend taking preventative measures first so that you don’t have to go through this in the first place:
- Back up any important documents
- Disable disk encryption in the settings (which will factory reset the device)
I’m very grateful for the remarkable2-recovery tools and the helpful reMarkable hacking community made this recovery possible.
Questions or comments? Sign in with GitHub to comment below!